Kindness

Kindness is essential in our daily lives.
I will share weekly a new post with a message of how powerful kindness really can be.

Tuesday, April 5, 2011

DID YOU KNOW?


  • Take your bananas apart when you get home from the store. If you leave them connected at the stem, they ripen faster.
  • Store your opened chunks of cheese in aluminum foil.  It will stay fresh much longer and not mold!
  • Peppers with 3 bumps on the bottom are sweeter and better for eating. Peppers with 4 bumps on the bottom are firmer and better for cooking.
  • Add a teaspoon of water when frying ground beef.  It will help pull the grease away from the meat while cooking.
  • To really make scrambled eggs or omelets rich add a couple of spoonfuls of sour cream, cream cheese, or heavy  cream; then beat them.
  • Add garlic immediately to a recipe if you want a light taste of garlic and at the end of  the recipe if your want a stronger taste of  garlic.
  • Heat leftover pizza in a nonstick skillet on top of the stove; set heat to med-low and heat till warm. This keeps the crust crispy.  No soggy micro pizza.
  • For great deviled eggs put cooked egg yolks in a zip lock bag. Seal;  mash till they are all broken up. Add  remainder of ingredients, reseal, keep mashing it up mixing thoroughly, cut the tip of the baggy; squeeze mixture into egg.  Just throw bag away when done - easy clean up.

  • To warm biscuits, pancakes, or muffins that were refrigerated, place them in a microwave next to a cup of water. The increased moisture will keep the food moist and help it reheat faster.

  • Start putting torn newspaper in your garden plants, work the nutrients in your soil. Wet newspapers, put layers around the plants, overlapping as you go; cover with mulch and forget about weeds. Weeds will get through some gardening plastic; they will not get through wet newspaper.
  • To get something out of a heat register or under the fridge add an empty paper towel roll or empty gift wrap roll to your vacuum. It can be bent or flattened to get in narrow openings.
  • Pin a small safety pin to the seam of your slip and you will not have a clingy skirt or dress. Same thing works with slacks that cling when wearing panty hose. Place pin in seam of slacks and ... Ta  DA! .. Static is gone.
  • Before you pour sticky substances into a measuring cup, fill with hot water. Dump out the hot water, but don't dry cup.  Next, add your ingredient (peanut butter, honey, etc.) and watch how easily it comes right out.
  • Foggy  Windshield: Buy a chalkboard eraser and keep it in the glove box of your car. When the windows fog, rub with the eraser! Works better than a cloth!
  • Opening Envelope: If  you seal an envelope and then realize you forgot to include something inside, just place your sealed envelope in the freezer for an hour or two. Viola! It unseals easily.
  • Conditioner: Use your hair conditioner to shave your legs. It's cheaper than shaving cream and leaves your legs really smooth.  It's also a great way to use up the conditioner you bought but didn't like when you tried it in your hair.
  • Goodbye Fruit Flies: To get rid of pesky fruit flies, take a small glass, fill it 1/2 with Apple Cider Vinegar and 2 drops of dish washing liquid; mix well. You will find those flies drawn to the cup and gone forever!
  • Get Rid of Ants: Put small piles of cornmeal where you see ants. They eat it, take it 'home,' can't digest it so it kills them. It may take a week or so, especially if it rains, but it works and you don't have the worry about pets or small children being harmed!
  • Safety Issue for the Clothes Dryer: The heating unit went out on my dryer! The gentleman that fixes things around the house for us told us that he wanted to show us something.  He went over to the dryer and pulled out the lint filter. It was clean. (I always clean the lint from the filter after every load of  clothes.) He took the filter over to the sink and ran hot water over it. The lint filter is made of a mesh material.  I'm sure you know what your dryer's lint filter looks like. Well .... the hot water just sat on top of the mesh!  It didn't go through it at all! He told us that dryer sheets cause a film over that mesh - that's what burns out the heating unit. You can't SEE  the film, but it's there. It's what is in the dryer sheets to make your clothes soft and static free. You know how they can feel waxy when you take them out of the box ...  well this stuff builds up on your clothes and on your lint screen. This is also what causes dryer units to potentially burn your house down with it! He said the best way to keep your dryer working for a very long time (and to keep your electric bill lower) is to take that filter out and wash it with hot soapy water and an old toothbrush at least every six months.  He said that increases the life of the dryer at least twice as long!

Thursday, March 31, 2011


Oatmeal Chocolate Chip Cookies

                    1 1/2 C brown sugar                                       1 1/2 C all purpose flour
                    1 C butter or margarine softened                   1 Tsp baking soda
                    1 Tsp vanilla                                                    dash salt
                    1 egg                                                                 1 C semi-sweet chocolate chips
                    2 C quick-cooking oats                                   1 C chopped nuts (optional)

Preheat oven to 350 degrees F. Mix brown sugar and butter together until well blended. Stir in vanilla and egg until light and fluffy. Stir in oats, flour, baking soda and salt. Stir in chocolate chips and nuts (optional). Drop dough by rounded tablespoon onto ungreased cookie sheet 2" apart.  Bake 9-11 minutes until light brown. Makes approximately 3 1/2 dozen. (The quantity depends on the size you make the cookie.  Because we prefer smaller cookies I use more of a level tablespoon measurement and get 60 cookies +/-.)

Wednesday, March 30, 2011

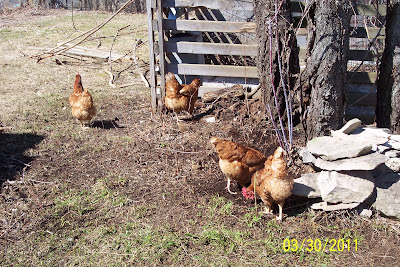
Hanging Outdoors with the Chicks

Today was dedicated to the hens who have been holed up in their coop until their outdoor run could be made more predator proof.

The hub did a fine job placing galvanized sheet metal across the area where we think the mink entered and took the life of two of our chickens. The digging was tough because the ground was still sort of frozen but it had to be done in order to bury the metal deep enough to prevent other predators from visiting. The height of the run is less than 5' tall so the job had to be done either sitting down or on your knees. It was a tough job but someone had to do it. Tomorrow we'll be heading to the farm & tractor store to get tighter fencing that will also provide better protection for the chics.

Wearing my cutesy powder blue knee-high farmette boots and cutesy powder blue leather-palmed work gloves I raked out the inside of the outdoor chicken run that was filled with lots of old hay/straw, leaves, chick manure and tell-tale signs of the chicken massacre. Another bale and 1/2 of straw was torn apart and spread evenly inside the run for the chicks to get comfy once again. Not only does this provide them with lots of seeds to pick at, their momma likes them to have clean feet. The run is 8'  wide x 16' long and less than 5' tall so I would honestly describe it as a back-breaking job. It was a tough job but someone had to do it. Three wheelbarrow fills were dumped onto our garden plot and spread in anticipation of good compost for our future garden.
The chickens were let loose to free-range to their hearts content. For the most part they stayed together in one area so it wasn't hard to keep an eye on them. They scratched and pecked like there was no tomorrow.

I took the opportunity to clean out the indoor coop also while the girls were busy doing their thing outdoors. With flat bottom shovel and wheelbarrow I got two loads to dump into my newly-started compost pile that would be used next year on the vegetable garden. The chickens followed me to the new dumping grounds and had a field day scratching in this pile. As you probably have guessed by now, the boots and gloves are no longer cutesy!

By this time I was dead tired and I might add starving as it was way past lunch time. The hub wasn't quite finished with his project yet but I recruited him to assist me in getting the chicks back inside. As I corralled one he would lift up the door to the coop and I would gently push her inside. One down, three to go. Two down, two to go. Three down, one to go. The last bird was determined that she wasn't going in and ran in circles for me to catch her. Who needs a gym??? After getting cornered she squatted for me to pick her up and inside she went with the others.

As I entered the coop to make sure it was locked up tight they were all sitting on the roost letting me know how much they appreciated their scratch and dig outing. Just another day as a chicken momma.


Sunday, March 27, 2011

RIP Lucky

Lucky, our wannabe rooster and the only hen identifiable by a specific marking, along with one of her sister chicks is no longer with us.

When a flock of hens is without a rooster a dominant hen will step up to the plate to oversee her 'sister girlfriends' as a rooster normally would do. Lucky, our dominant female, stepped up to the plate. She would always come back into the hen house to check out who was there and what was going on. She always guarded the nest boxes and cackled at us for taking the daily egg production. She walked around the outdoor chicken run being the first one to cackle at anyone within distance. She was #1 in the pecking order and proved it in many ways.

On Tuesday, 3/22/11, Lucky fought fiercely with a chicken predator that tunneled under the hen house right up into the enclosed (with fencing) outdoor chicken run. Less than 2 hours after I fed the chicks, collected their eggs and let them outdoors for some fresh air a muscular female mink with razor sharp teeth and a killer-instinct made a sneak attack on our six chickens. Even though the chicks are fenced in (top and sides) I periodically look out the window just to make sure they're OK. On this particular day it looked like it had snowed in the run. Confused, I looked and stared. From here in the house I couldn't see any chickens wandering about. It quickly dawned on me that these could be chicken feathers. My heart sank and I started shaking. I screamed for my husband to quick run down to the coop and check out what had happened. He called up to me that there were two chickens that were brutally killed. Without getting descriptive it was apparent that Lucky gave her life in protecting her flock.

The remaining four chickens were traumatized. We had to physically force them indoors where they would be safe. The noises they were making were sounds of fear. They refused to eat or drink anything that night. One of the remaining chicks received an injury to her leg, was shaking and developed diarrhea. I was in fear for them and worried sick myself but I knew as long as they were inside the chicken coop they were safe for the time being. These four chickens amazed me the following morning. They never skipped a beat in their egg production. Following such a horrendous attack they somehow found the strength to produce four beautiful brown eggs the very next morning and they continued to do so every day since. They have made a miraculous recovery and I'm happy to report they are now all in good health and enjoying their routine snacks and feed.

Thanks to a local trapper the mink was caught the very next morning as he tried once again to enter into the outdoor chicken run through the same tunnel. As soon as the weather cooperates there will be metal fencing/sheeting buried deep enough into the ground along the barn side of the run where this creature tunneled from to make sure this can never happen again. At the same time the remaining feathers will be cleaned out and fresh new straw will be made available for the chicks return to the outdoors.

Most chicken farmers have faced losing some of their flock to predators at one time or another. Sometimes, no matter how much you watch over them, it's inevitable that something is lurking somewhere. We thought we had done everything possible to protect our flock. Through this experience we learned another valuable lesson to enable us to provide more protection to our 'girls.'

The four 'sister' hens will now have to decide a new pecking order. The strongest of the four will hopefully step forward to fill Lucky's shoes (even though they're not too lucky). There's also a good possibility we might add a few more chicks to the flock after the weather breaks and everyone is settled down.

May you, Lucky, rest in peace.


Wednesday, March 16, 2011

A Sign of Spring 2010 vs 2011


hanging out laundry 3/15/2011
As the days get longer, the weather warmer and the sun brighter one of my favorite things to do is hang fresh washed laundry outdoors on the line to dry. Yesterday, 3/15/2011, (with temperature predicted to be near 50's and sunny) proved to be a perfect day for my early spring ritual. The jeans got washed and hung out by noon. Having plans for being gone the rest of the day the responsibility of picking them up rolled over to the man of the house. As instructed (by me) he picked them up between 4:00 - 5:00 pm dry for folding. I couldn't help but take a deep smell from them for sheer enjoyment as soon as I got back home. Ah, the fresh smell of laundry hung out to dry, it's a beautiful thing.

hanging out laundry 3/12/2010
Although it's no contest, I look forward to reaching this date earlier in the season each year. Last year my first hang out was 3/12/2010 so the dates were darn close! Last year this time there was much more snow on the ground but the temperature that day reached 61 degrees.

The peonies and lillies pushing up through the ground lift my spirits! I'm sure all my fellow gardeners out there are chomping at the bit just like me wanting to get outside. Sunday March 20, 2011 at 7:21PM EDT or 11:21PM Universal Time, is the official day of spring. Get out of my way, here I come!

Here's a tip to those who share the love of hanging laundry outdoors: The clothes pin baskets purchased in the stores aren't very sturdy so if you have any sewing talent, make your own. I made one using some very sturdy material I had sitting around by improvising from a free on-line pattern; you're able to custom make it for size and strength. Make it a point to bring it indoors after use to protect it from the elements and it will serve you many, many years. This is the third year of life for mine and it's still in great shape. If you're interested, a website for checking out is: http://tipnut.com/11-free-clothespin-bag-patterns/

Thursday, March 10, 2011

Freezing corn for the winter

The fresh taste of corn from the cob can be a reality in the dreaded winter months. Eating it as a vegetable side dish or as the main ingredient of homemade corn chowder is an awaking of your taste buds.

Buying a dozen ears of corn at your local farm stand is usually less expensive than buying 4 or 5 ears at your favorite supermarket and probably much fresher; growing it yourself is better yet. Cook the entire dozen in a large kettle as you  normally would.

Simply by stripping the cooled corn from the cobs that were left from immediate consumption into a flat pan or bowl starts the process. The fastest and easiest way to do this is by using an electric knife.  Zip, Zip, all done! If you don't own an electric knife a serrated steak knife works. USE CAUTION.

The majority of the corn kernels stripped from the cob will be in long strips so it'll be necessary to break these up into smaller pieces. This is the time when you'll steal tastes (yum).

Using a large spoon fill whatever size freezer bag meets your needs for serving size. I use a quart size bag and weigh it with my scale for consistent contents. Make sure there is no air in the bag and then pat them flat for storing in your freezer one on top of the other. These are only suggestions. For a family of one, pint bags may work and if you have a small freezer it certainly isn't necessary to flatten the bag.

Once you've tasted your own frozen fresh garden corn it'll be hard to go back to store bought canned corn. Believe me, I haven't been doing this for 20 years for nothing!  Enjoy!

P.S.  It's usually cheaper to buy a whole bushel of corn so consider splitting the cost of the purchase with a friend or two and splitting the efforts too.  Good idea?
  

Monday, March 7, 2011

How Much Snow is Too Much Snow (03/07/2011)


Driveway after plowing.
 Whooda thunk that our humongous 2500 Dodge hemi pickup (with a plow attached) could possibly get stuck alongside our driveway today. Is this giving you a clue to what kind of snowfall we had here in Syracuse New York and the surrounding area??? Having been a member of AAA for 33 years I gave them a call to be told the wait list could be up to 6 hours. I agreed with the representative that being stuck in our driveway with the comforts of home nearby is  much better than being out and about possibly stuck somewhere on the side of the highway. It wasn't much later that I got a call back from AAA letting me know service would now arrive within 2 hours. To my surprise they got here much sooner and within a very short time pulled the truck back onto the driveway. This is one service I'll probably have forever. The photo below shows what the driveway looked like before it got plowed.
 
Driveway before plowing.
A picture is worth a thousand words. To support this expression are some photos that I took today of my two small dogs trying to get around in the small area I shoveled for them to do their thing.  Libby Lu is a 22 lb Puggle (part Pug/part Beagle) and Ginger is a 13 lb Jug (part Jack Russell Terrier/part Pug) who share January 2009 as their birth month and year. When their daddy gets back from plowing he'll snow blow the usual paths around the back yard but in the meantime they'll have to make do with what I have provided them.
  
You gotta go when you gotta go and that's the fact!

 
Libby Lu doesn't know which way to turn.


Little bitty Ginger wants to take off but it won't happen here.
     
Way too much snow for the dogs and for me!

Take it to the Grave Chocolate Cake

Many, many, many years ago one of my mother's best friends shared with us her secret family recipe for delicious chocolate cake and the best ever chocolate frosting. Occasionally she would join our immediate family members at Sunday dinner and sometimes bring this cake to share for our desert enjoyment. Her recipe was so secretive she made us promise that we would never share it with anyone else, and we upheld the promise until this day. It's been many years since this good friend passed away and I'm ready to lift the lid off the coffin.

I've tried many recipes from the Internet, some were A+ and some were D-. My taste buds rate this A+.  The frosting is so delicious and easy to make it can be used alone on a standard store-bought box cake mix if you so choose. What makes this so easy is that the ingredients in these two recipes are staples that most everyone has in their cupboards.
Delicious Chocolate Cake

                                                 o  3 C flour                           o  2/3 C oil
                                                 o  1 3/4 C sugar                  o  1 Tsp vanilla
                                                 o  2 Tsp baking soda         o  2 C water
                                                 o  1/2 C cocoa                      o  2 Tbsp vinegar
                                                 o  1 Tsp salt

Heat your oven to 350 degrees F. Coat the bottom of the pan with shortening. In a large bowl mix all the ingredients together and pour into your prepared pan. I bake a 13"x9" pan for 45 minutes +/-. When a toothpick inserted into the center of the cake comes out clean, the cake is done. Sometimes I use my finger to press down on the center of the cake and if the cake pops right back up it also means it's done. Different size pans can also be used but you'll have to experiment on the cooking time.

Best Ever Chocolate Frosting

Combine 3 3/4  tbsp flour with 3/4 cup of milk in a small saucepan. Mix the milk into the flour slowly to avoid getting lumps. Cook this mixture over medium heat until real thick. Set aside to cool. In the meantime cream 3/4 cup shortening (Crisco) with 3/4 cup sugar. Add to this 5 tbsp cocoa and a few grains of salt. Combine the two mixtures when the cooked ingredients are cool and beat until light and creamy.

It's not that I can't keep a secret. I love to cook and bake and, although it doesn't happen all the time, I prefer to make unprocessed from-scratch cakes. Personally, I can't think of any good reason why I should take this recipe to my grave and not share it with all of you for your enjoyment. Can you?

Sunday, March 6, 2011

Black Raspberry Jam...to die for!

During the summer 2010 I began feeling down about not having crops to harvest from the lack of any at-home vegetable garden. With nothing to harvest for the first time in 20 years I directed my concentration on filling the shelves in the cold storage room with jellies and jams. The first 2010 batch of jam produced in my sweet little kitchen (and my favorite flavor to eat by far) was the black raspberry jam. The picking, being the first ever for berries other than here at home, was done in the sweltering heat of summer in Baldwinsville. Other than not remembering to bring some much needed cold water to quench our thirst, I developed an intestinal problem (yes, there were portable buildings for this  - yuk) and my picking partner husband tripped and spilled the majority of the berries he had already picked onto the ground lost forever. Losing the berries from that fall proved to be a blessing because we hadn't realized we over picked until we went to pay for our purchase and was given the bill. Whew, I had no clue how much this was going to cost, so I was in sticker shock; duh, it would have been wise to ask what the price per pound was before starting to pick. In the end we had way more than enough berries for making an ample supply of black raspberry jam to die for. I'd like to report that I have already ordered some black raspberry bushes from my favorite supplier and I can't wait for them to arrive in the spring for planting. Possibly in the next year or two I'll be able to harvest them here in my very own backyard where I'll be closer to public utilities. : )


The Results of a Hearty Rhubarb Patch - Pineapple Strawberry Rhubarb Jam

In the earlier days when my mom was younger I used to take a vacation day from work and join her at her house where we would prepare, cook and freeze at least 15 rhubarb pies to enjoy through the winter months. Mom would prepare the dough basically by recall and roll it out with her trusty dowel into the pie plates. I would pick, wash, slice and prepare the rhubarb for the filling. There were two ovens cooking pies at all times (one in the kitchen and one in the basement). After each pie cooled off it was double wrapped in foil and placed in the freezer for future eating. It was an all-day job but sooooo rewarding. Just pull the frozen pie out of the freezer on a cold winter day and pop it in the oven for reheat and now you’ve got a great comfort dessert. This truly represents fond memories of what one calls the good old days. F.Y.I. Rhubarb is a vegetable that is prepared and eaten like a fruit. A good website for lots more info on rhubarb:  http://gardening.about.com/od/vegetables/a/Rhubarb.htm  Not doing that many pies anymore I took the time last year to find another great use for my rhubarb. I struck it rich when I made this jam recipe. I went to the Aldi’s grocery store and bought the ingredients at a lower cost so it wasn’t that expensive to prepare. I did invest in some ‘made for jelly’ canning jars that were a little more costly but I’ll be using these again, and again, and again. This is the recipe I used (which I doubled):

Simple Pineapple Strawberry Rhubarb JamPINEAPPLE STRAWBERRY RHUBARB JAM

4 c rhubarb, cut into 1/2 pieces
4 c sugar
1 can crushed pineapple 8 oz
1 pkg. strawberry jello 3 oz

Mix sugar and rhubarb and allow to stand until juice exudes (even overnight).  Boil 12 minutes at a rolling boil.  Add pineapple and simmer 3 minutes more.  Remove from heat; add jello and stir until dissolved.  Pour into sterilized jars and seal.

You’ll be surprised at the flavor – it doesn’t taste at all like rhubarb.  Let me know if you try this and how successful it was.

If you’ve never canned before you’ll need to learn the correct method to prepare your jars.  It’s not that difficult and by following these steps you’ll avoid the problem of not having your jar seal properly.
http://www.bellaonline.com/articles/art2816.asp

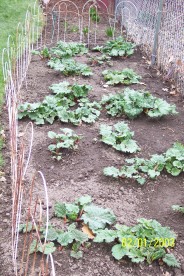
A Hearty Rhubarb Patch

Rhubarb Patch
Rhubarb Patch3We probably started this rhubarb patch some 15 -  20 years ago. We found it growing in a back area of our property buried by weeds (probably planted by the previous home owner and forgotten about). We decided to dig it up and move it closer to the house to make it easier to manage and harvest with absolutely no idea of what we would do with the harvest. As we dug it up we split the plants and as you can see in my photos the patch produces a sizeable quantity that we're able to share with a couple of regulars who enjoy using the rhubarb as much as I do in different recipes. For more information on growing rhubarb visit the The Rhubarb Compendium where they also provide lots of rhubarb recipes for you to peruse. A fence around your rhubarb patch is not necessary unless you have a dirt digger dog like mine or a male dog who lifts his leg. Tuxedo my cat uses this loose soil as his private toilet as he does every other flower or vegetable bed I cultivate. It’s a very small price to pay for vermin control! As soon as the weather permits I’ll be emptying the results from my last year composting and spreading it through the soil around the rhubarb plants.

The Art of Making Grape Jelly

Realizing that the lack of garden crops would leave the shelves in the cold storage room barren I made every effort to come up with some substitutes to fill those empty shelves. First I started looking in and around my own backyard. Aha!  Mom and Dad have an enormous grape arbor in their backyard and with mom no longer making grape jelly I gladly picked from their arbor an amount of grapes that would produce enough grape jelly for their pantry as well as mine. 

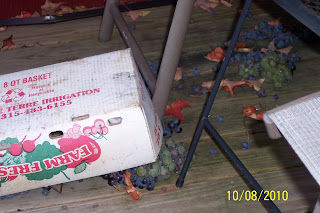
The grapes were at their peak at picking time but I wasn't able to fit the processing of grapes to jelly in my schedule on that day. Not to worry, the weather was cool so I set them outside on a patio table under an umbrella in a somewhat shady area to hold them over until I had an opening in my schedule for processing. During their second night of being outdoors a mighty windstorm swept up onto the deck and flipped the basket of grapes over crushing the majority of them.
Another grape picking trip to the home of my parents sent me away with two bountiful baskets of terrific concord grapes.  Wanting to be sure that I got the job done I started the process of straining the juice that evening and continued the process again on the next day.  It wasn't until the third day that I actually made the jelly. This fall I'll do it all over again (with the exception of storing the grapes outside on the table). 

To some it might seem like an endless chore, but to me it was a labor of love.

Saturday, March 5, 2011

Planting Tomatoes in Non-Traditional Containers


Last summer family illness and emergencies kept me from planting our traditional garden but I was determined to grow tomatoes any way I could. After much searching through our cast-off junk I was able to drag out an old hot water tank that had already been cut in half and the basin from inside an old broken down washing machine (talk about resourceful). Placement was the next important step to make sure it got enough sun, was close enough to an outdoor water supply and close enough to the house to make it easy for the tending gardener (me). After setting up both containers and stabilizing them we filled them with bags of amended soil we bought at our local feed store. I then bought four of the larger tomato plants which are more widely described as 'patio tomato plants.' Because they are planted in a container and not in the ground it's most important that they are watered daily - preferably early in the morning. Alongside and around the tomato plants I inserted small basil plants; what a great combination. I planted one of the patio tomato plants in a vintage Radio Flyer red wagon with high wooden trim..and this also provided an abundance of delicious ripe tomatoes. Since the wagon had wheels it was a plus to be able to move the wagon during the day to be placed in a bright sunny location. Non-traditionally I had a crop of traditional home-grown tomatoes which satisfied my needs for picking from the garden.

Tomatoes growing in an old hot water tank that was cut in half.

A vintage Radio Flyer red wagon and old basin from inside of an old washing
machine both sporting a 210 tomato plant.
 

Homesteading Made Easy

If it's easy for me, it's easy for you.  Raising dogs and cats - easy peasy. Raising chickens - a little more difficult. Planting and maintaining flower beds - a little more time consuming and good exercise. Planting a vegetable garden - lots more time, some knowledge and a strong back (depending on how large it is) and excellent exercise. How large it is depends on how much you want to plant in your garden. If it's for immediate use only (harvesting and eating your crops throughout the summer) you'll require a smaller area. If you're wanting an abundance of crops for preserving (canning, freezing, dehydrating) plan on making it larger. I'll share with you how last year I didn't have time for a 'real garden' but had a super abundance of tomatoes and basil from the patio plants I planted in strange containers. Successful gardening in previous years here on my homestead produced an abundance of crops that were used for canning, freezing and dehydrating. There is a great sense of accomplishment when looking at the canned carrots, string beans, tomatoes, pickled beets, relish, and various kinds of jelly on the shelves in the cold storage room.
Canned tomatoes, string beans, rhubarb jelly, green tomatoe relish, and maple syrup.